
|
|
[China]

Trade Verify
Address: Building 16 Golden Town Houjie Dongguan Guangdong China.
Contact name:Michael

Guangdong Blue Whale Ultrasonic Equipment Co;Ltd |
|
Verified Suppliers
|

|
|
Blue Whale Two Tanks 99L Industrial Ultrasonic Carb Cleaner with Cleaning Heating and Spraying Function
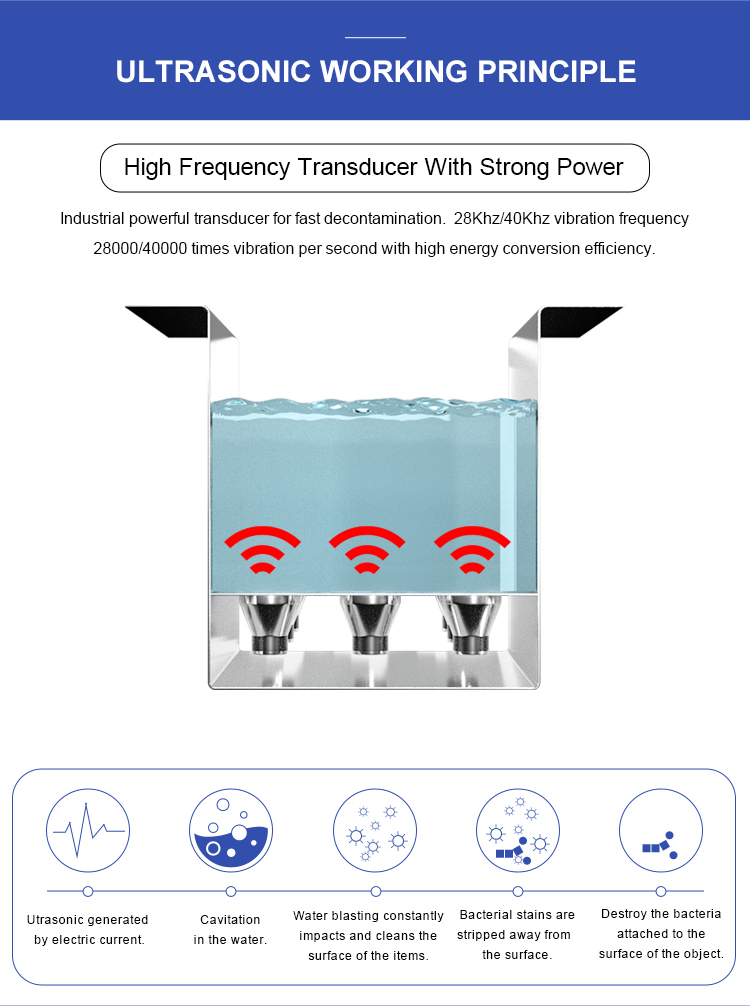
1. What is ultrasonic cleaning technology?
Cleaning Mechanism: The cleaning action in ultrasonic cleaning is primarily achieved through the process of cavitation. Cavitation occurs when low-pressure areas form within the cleaning solution due to the ultrasonic waves. This leads to the formation of tiny bubbles or voids. As the pressure fluctuates, these bubbles rapidly expand and collapse, releasing energy in the form of shockwaves. The collapse of these bubbles near the surface being cleaned creates intense scrubbing action, dislodging and removing contaminants.
Cleaning Solution Considerations: The choice of cleaning solution depends on the type of contaminants being removed and the material being cleaned. Cleaning solutions can be water-based or solvent-based and may contain additives such as detergents, surfactants, or specialized chemicals to enhance the cleaning process. The cleaning solution should be selected based on its compatibility with the materials being cleaned, the desired cleaning efficacy, and any specific industry standards or regulations.
Frequency Selection: Ultrasonic cleaning machines are available in different frequency ranges, typically ranging from 20 kHz to 200 kHz or higher. Lower frequencies, such as 20 kHz, are suitable for heavy-duty cleaning applications involving robust parts and larger contaminant particles. Higher frequencies, such as 40 kHz or 80 kHz, are commonly used for general-purpose cleaning and cleaning delicate items.
Temperature Control: Ultrasonic cleaning machines often include temperature control features, allowing the operator to adjust and maintain the temperature of the cleaning solution. Higher temperatures can enhance cleaning efficiency by accelerating chemical reactions and improving the solubility of certain contaminants. However, it's important to ensure that the temperature remains within safe limits for both the items being cleaned and the cleaning solution being used.
Post-Cleaning Rinse and Drying: After the ultrasonic cleaning process, it is typically recommended to rinse the cleaned items with clean water to remove any residual cleaning solution or loosened contaminants. This helps ensure a thorough cleaning and avoids potential residue buildup. Following the rinse, proper drying methods, such as air drying or the use of drying cabinets, may be employed to ensure complete drying and prevent the formation of water spots or corrosion.
Automation and Process Control: Ultrasonic cleaning machines can be equipped with automation features and advanced process controls. This includes programmable cleaning cycles, adjustable power levels, timers, and temperature controls. Automation allows for consistent and repeatable cleaning processes, reducing human error and improving overall cleaning efficiency.
It's worth noting that while ultrasonic cleaning is highly effective for many applications, there may be certain limitations. For example, certain materials, such as porous materials or items with loose or fragile components, may not be suitable for ultrasonic cleaning. Additionally, some delicate items may require specific precautions or specialized cleaning procedures to avoid damage.
Overall, ultrasonic cleaning technology offers a versatile and efficient method for removing contaminants from a wide range of objects and surfaces, contributing to improved cleanliness, functionality, and longevity of various materials and components.
2. Product Features:
1). Working process: the 1st tank ultrasonic cleaning with heating,
remove the rust, grease and dust from the cleaning items. The 2nd
tank high pressure spraying to provide deep cleaning service. The
alarm buzzes once complete the spraying process.
2). The inner tank material: the use of 304 stainless steel,
thickened to 2mm, manual argon welding, strong and durable;
3). Adjustable time: 1-99 minutes/hour adjustable, can be opened
often;
4). Memory function: the device has an independent memory chip, and
there is no need to reset over and over after the time is set;
5). Equipment power cord: the use of industrial thickened power
cord, safe and durable;
6). Industrial grade transducer: the use of industrial shock head,
strong force and good effect, can work 24 hours uninterrupted;
7). Generator control system: independent generator control system,
flexible control, can be set according to the user's cleaning needs
to adjust the ultrasonic power;
8). Heating automatic constant temperature system: 20-95 degrees
adjustable, equipped with stainless steel heating tube, fast
heating speed.
3. Double Tanks Industrial Ultrasonic Cleaner CHS Series:
Ultrasonic Cleaning, Heating, High Pressure Spraying
4. Are there any specific safety precautions that should be taken when using ultrasonic cleaning machines?
There are specific safety precautions that should be followed when using ultrasonic cleaning machines. Here are some important safety measures to consider:
Personal Protective Equipment (PPE): Wear appropriate personal protective equipment, such as safety goggles, gloves, and protective clothing, when operating the ultrasonic cleaning machine. PPE helps protect against potential splashes, spills, or exposure to cleaning agents.
Ventilation: Ensure that the area where the ultrasonic cleaning machine is used is well-ventilated. Some cleaning solutions may emit fumes or vapors that could be harmful if inhaled. Proper ventilation helps maintain a safe working environment.
Electrical Safety: Ensure that the ultrasonic cleaning machine is properly grounded and the electrical connections are in good condition. Avoid using the machine near water sources or in damp environments to prevent electrical hazards.
Chemical Safety: Handle cleaning solutions with care and follow the manufacturer's instructions regarding their use, storage, and disposal. Some cleaning solutions may be hazardous or corrosive, so it's important to understand their properties and take appropriate precautions.
Avoid Direct Contact: Avoid direct contact with the cleaning solution, especially with bare skin. If accidental contact occurs, promptly rinse the affected area with clean water and seek medical attention if necessary.
Machine Inspection: Regularly inspect the ultrasonic cleaning machine for any signs of damage or malfunction. Check the power cords, controls, and transducers to ensure they are in good condition. Do not use a machine that is damaged or not functioning properly.
Safe Loading and Unloading: Take care when loading and unloading items into the cleaning tank. Use appropriate tools or accessories provided by the manufacturer to prevent injuries or damage to the items and the machine.
Temperature Control: If the ultrasonic cleaning machine includes temperature control features, ensure that the temperature remains within safe limits. Avoid operating the machine at excessively high temperatures that could pose a risk of burns or damage to the items being cleaned.
Safe Handling of Items: When removing items from the cleaning tank, be cautious as they may be hot or slippery. Use proper handling tools or equipment to prevent injuries.
Emergency Preparedness: Familiarize yourself with the location of emergency exits, fire extinguishers, and other safety equipment in the vicinity of the ultrasonic cleaning machine. In case of an emergency, follow appropriate emergency procedures and contact emergency services if necessary.
Remember to carefully read and follow the manufacturer's instructions and safety guidelines specific to your ultrasonic cleaning machine. These guidelines may provide additional safety precautions and recommendations tailored to the particular model you are using.
5. How to properly ground an ultrasonic cleaning machine?
Proper grounding of an ultrasonic cleaning machine is essential for electrical safety. Grounding helps protect against electric shocks and ensures the safe operation of the equipment. Here are some guidelines on how to properly ground an ultrasonic cleaning machine:
Consult the Manufacturer's Instructions: The manufacturer's instructions and user manual for your specific ultrasonic cleaning machine should provide guidance on grounding requirements. It is important to follow these instructions as they are specific to your machine's design and electrical specifications.
Use a Grounded Electrical Outlet: Ensure that the electrical outlet you use for the ultrasonic cleaning machine is properly grounded. Grounded outlets typically have three prongs, including a grounding pin. Avoid using ungrounded or two-prong outlets, as they do not provide the necessary grounding protection.
Check the Power Cord: Inspect the power cord of the ultrasonic cleaning machine for any signs of damage, such as frayed wires or exposed conductors. If the power cord is damaged, do not use the machine until it is repaired or replaced by a qualified technician.
Use a Grounding Plug or Wire: Some ultrasonic cleaning machines come with a grounding plug or wire. This additional grounding component is designed to be connected to a grounding point or a metal part of the machine. Follow the manufacturer's instructions on how to properly connect and secure the grounding plug or wire.
Grounding to a Suitable Earth Ground: For proper grounding, it is important to connect the ultrasonic cleaning machine to a suitable earth ground.
This can be achieved by attaching the grounding wire to a designated grounding point such as a metal water pipe, a grounding rod, or a grounding system provided by the building's electrical system. Consult an electrician or a qualified professional to ensure the grounding connection is done correctly and in compliance with local electrical codes.
Periodic Grounding Inspection: Regularly inspect the grounding connection of the ultrasonic cleaning machine to ensure it is secure and intact. Check that the grounding wire is properly connected and that there are no loose connections or signs of damage.
Remember, it is crucial to follow the manufacturer's guidelines for grounding your specific ultrasonic cleaning machine. If you have any doubts or concerns about the grounding process, it is recommended to consult an electrician or a qualified professional to ensure proper grounding and electrical safety.
6. Can ultrasonic cleaning machine to be used to clean carburetors?
Yes, ultrasonic cleaning machines are commonly used to clean carburetors. Carburetors can accumulate varnish, dirt, and other contaminants over time, which can affect their performance. Ultrasonic cleaning is an effective method for thoroughly cleaning carburetors, including the intricate passages and small components that can be difficult to reach by manual cleaning methods. Here are some key points to consider when using an ultrasonic cleaning machine for carburetor cleaning:
Disassembly: Before placing the carburetor in the ultrasonic cleaner, it is generally recommended to disassemble it as much as possible. Remove any removable parts such as jets, needles, float bowls, and gaskets. This allows for a more thorough cleaning and prevents damage to delicate components during the cleaning process.
Cleaning Solution: Select a suitable cleaning solution for carburetor cleaning. There are specialized carburetor cleaning solutions available that are formulated to remove fuel varnish, carbon deposits, and other contaminants specific to carburetors. These solutions are often water-based and may contain detergents or specialized chemicals. Follow the manufacturer's instructions for dilution ratios and proper use of the cleaning solution.
Proper Placement: Place the disassembled carburetor parts in the cleaning basket or tray of the ultrasonic cleaner. Avoid overcrowding the cleaning basket to ensure proper exposure of all surfaces to the ultrasonic waves.
Ultrasonic Cleaning Cycle: Set the ultrasonic cleaner to the appropriate cleaning parameters, including frequency, power level, and cleaning time. The recommended frequency for carburetor cleaning is typically in the range of 40 kHz to 80 kHz. The cleaning time may vary depending on the level of contamination, but a typical cleaning cycle can range from a few minutes to half an hour.
Rinse and Dry: After the ultrasonic cleaning cycle, rinse the carburetor parts thoroughly with clean water to remove any residual cleaning solution. Use compressed air or a gentle stream of air to remove excess moisture from the parts. Ensure that the parts are completely dry before reassembling the carburetor.
Reassembly and Testing: Once the carburetor parts are dry, reassemble the carburetor, ensuring that all components are correctly positioned. Conduct a thorough inspection of the parts for any signs of damage or wear. After reassembly, the carburetor should be tested to ensure proper functionality and performance.
Always refer to the manufacturer's instructions for your specific ultrasonic cleaning machine and consult any carburetor manufacturer recommendations or specifications for cleaning procedures. Additionally, take appropriate safety precautions, such as wearing gloves and eye protection, when handling cleaning solutions and carburetor parts.
7. Customer's Cleaning Feedback:


