
|
|
Trade Verify
Address: 170-422, Richards Street, Vancouver BC V6B 2Z4, CANADA
Contact name:Rosy

CITEST DIAGNOSTICS INC. |
|
Verified Suppliers
|
|
|
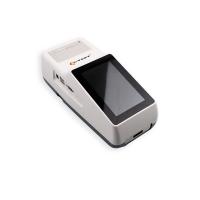
Fluorescence Immunoassay Analyzer (Handheld)
Application
| Test Method: | Fluorescence Immunoassay |
| Test Format: | Cassette |
| Measurement: | Quantitative, Qualitative |
| Read Time: | < 20 Seconds |
| Display: | 8000 Records |
| Memory: | DC 15V,AC 100-240V 50/60Hz |
| Power Source: | Rechargeable Li-ion |
| Built- in Battery: | battery(3300mAh*3) |
| Storage Condition: | -10-40℃,RH:20-90%, 86-106kPa |
| Printer: | Built-in thermal printer |
| Connectivity: | USB port, RS232 COM port, WIFI |
| Compatibility: | LIS |
| Dimensions(L*W*H): | 270*127*115mm |
| Weight: | <1.2kg |


