Dongguan Quality Control Technology Co., Ltd. |
|
Mechanical 10X Eyepiece Micro Vickers Hardness Tester Manual Turret Hardness Testing Device
Technical Data Download: iqualitrol Micro Hardness Tester iVick-450H
Product Features:
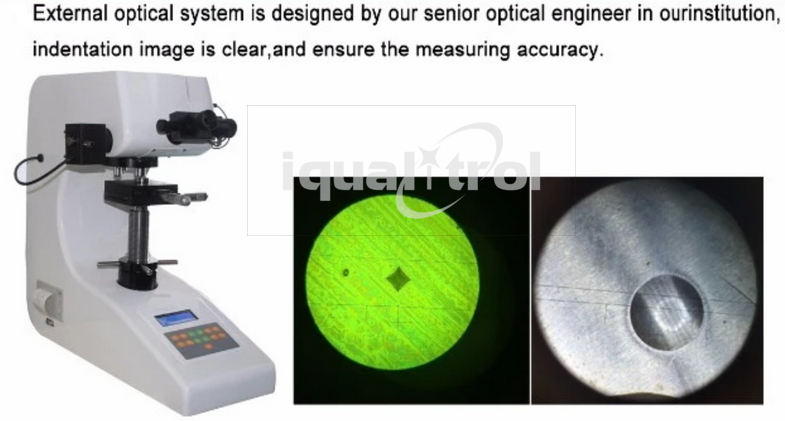
iVick-450H Micro Vickers hardness tester adopts unique precision design of optics, mechanic and electrics features, make the indentation image clearer, and get more precise measurements.
It can directly show the test mode, test force, dwell time, test numbers, conversion scale on the screen, only need to input the diagonal line of the indentation to get hardness value and shows on the screen.
Also available to install optional Knoop indenter to measure Knoop hardness.
Support to equip CCD image automatic measuring system.
Application range:
Suitable for ferrous metal, non-ferrous metals, IC thin sections, coatings, ply-metals; glass, ceramics, agate, precious stones, thin plastic sections etc.;
For hardness testing such as that on the depth and the trapezium of the carbonized layers and quench hardened layers.
Technical Specification:
| Model | iVick-450H | |
| Test Force | gf | 10gf, 25gf, 50gf, 100gf, 200gf, 300gf, 500gf, 1000gf |
| N | 0.098N, 0.246N, 0.49N, 0.98N, 1.96N, 2.94N, 4.90N, 9.80N | |
| Test Range | 1HV~2967HV | |
| Test Mode | HV/HK | |
| Loading Method | Automatic (Loading/Dwell/Unloading) | |
| Turret | Manual Turret | |
| Conversion Scale | HK, HRA, HRB, HRC, HRD, HRG, HRK, HR15N, HR30N, HR45N, HR15T, HR30T, HR45T, HBW | |
| Objective | 10x (Observe), 40x (Measure) | |
| Eyepiece | 10x Reading Microscope | |
| Total Magnification | 100x, 400x | |
| Resolution | 0.25μm | |
| Dwell Time | 0~60s | |
| Light Source | Halogen Lamp | |
| X-Y Test Table | Size: 100×100mm; Travel: 25×25mm; Resolution: 0.01mm | |
| Max. Height of Specimen | 100mm | |
| Throat | 98mm | |
| Power Supply | AC220V/50Hz/1Ph, AC110V/60Hz/1Ph | |
| Execute Standard | ISO 6507, ASTM E384, JIS Z2244,GB/T 4340.2 | |
| Dimension | 480×325×545mm, Packing Dimension: 600×360×800mm | |
| Weight | Net Weight: 31kg, Gross Weight: 44kg | |

Packing List:
| Name | Qty | Name | Qty |
| Instrument Main Body | 1 set | 10x Reading Microscope | 1 pc |
| Diamond Micro Vickers Indenter | 1 pc | 10x, 40x Objective | each 1 pc |
| Weights | 6 pcs | Weight Axis | 1 pc |
| Cross Test Table | 1 pc | Flat Clamping Test Table | 1 pc |
| Thin Specimen Test Table | 1 pc | Filament Clamping Test Table | 1 pc |
| Horizontal Regulating Screw | 4 pcs | Level | 1 pc |
| Fuse 1A | 2 pcs | Halogen Lamp 12V/15~20W | 1 pc |
| Power Cable | 1 pc | Screw Driver | 2 pcs |
| Hardness Block 400~500 HV0.2 | 1 pc | Hardness Block 700~800 HV1 | 1 pc |
| Anti-dust Cover | 1 pc | Usage Instruction Manual | 1 copy |
Note:
Special accessories: special accessories according to user needs.
1. Knoop indenter: can measuring some high hardness materials.
2, Provide 15 X micro-distance measuring eyepiece, total magnification for 640 * and * 40.
3, Provide 6.8 inch LCD screen can be equipped with, have tested indentation in the display on the screen and the measurement.
4. Provide equipped with image acquisition device, will impress clearly shown on a computer screen for automatic or manual measurement.
Indentation Image:

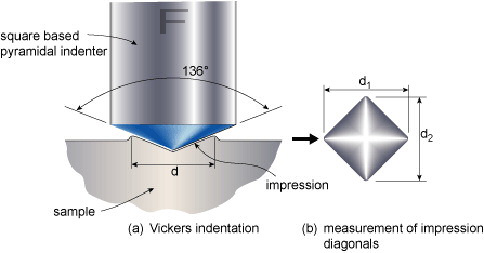
The Vickers hardness test method consists of indenting the test material with a diamond indenter, in the form of a right pyramid with a square base and an angle of 136 degrees between opposite faces subjected to a load of 1 to 100 kgf. The full load is normally applied for 10 to 15 seconds.
The two diagonals of the indentation left in the surface of the material after removal of the load are measured using a microscope and their average calculated. The area of the sloping surface of the indentation is calculated. The Vickers hardness is the quotient obtained by dividing the kgf load by the square mm area of indentation.
When the mean diagonal of the indentation has been determined the Vickers hardness may be calculated from the formula, but is more convenient to use conversion tables.

The Vickers hardness should be reported like 800 HV/10, which means a Vickers hardness of 800, was obtained using a 10kgf force. Several different loading settings give practically identical hardness numbers on uniform material, which is much better than the arbitrary changing of scale with the other hardness testing methods.
The advantages of the Vickers hardness test are that extremely accurate readings can be taken, and just one type of indenter is used for all types of metals and surface treatments. Although thoroughly adaptable and very precise for testing the softest and hardest of materials, under varying loads, the Vickers machine is a floor standing unit that is more expensive than the Brinell or Rockwell machines.